I have a Pi-Hole set up on my local network to try and reduce the number of ads that are constantly thrown at me, as well as allowing me to have some local DNS overrides (it can be really useful to be able to re-route domains locally when testing things). The one thing that has always bugged me is the fact that whenever I go to the local Pi-Hole dashboard I see that annoying warning in my browser telling me that the certificate is invalid and the website is not secure. Well I finally got around to fixing it, and I thought it may be worth documenting because all the resources I found online insisted on using certbot which seems to be way more complicated than LEGO.
Prerequisites
Let’s set some base parameters:
- You are running a working installation of Pi-Hole on a Raspberry Pi 3 (Model B+) with Raspberry Pi OS (effectively Debian Buster) and you have SSH access to it.
- You own a valid domain that you have control over, and as a result can legitimately acquire a certificate for it.
- You have your domain registered with a domain provider that is on the list of providers that LEGO supports
For the purposes of this article I’m going to use an example domain of pihole.example.com. You will need to swap this example domain for your real domain name in the following
instructions.
Setting a domain name for your Pi-Hole
First things first, let’s make sure that we have a DNS entry in our Pi-Hole that we can use in our internal network to navigate to the web dashboard of our Pi-Hole (You will need to change the IP address to whatever IP address your Pi-Hole has associated with it).
In your browser navigate to http://192.168.1.2/admin and log into your Pi-Hole.
Next navigate to http://192.168.1.2/admin/dns_records.php and fill in the following details:
- Domain:
pihole.example.com - IP Address:
192.168.1.2
Finally, click Add. You should see a screen that looks like this.
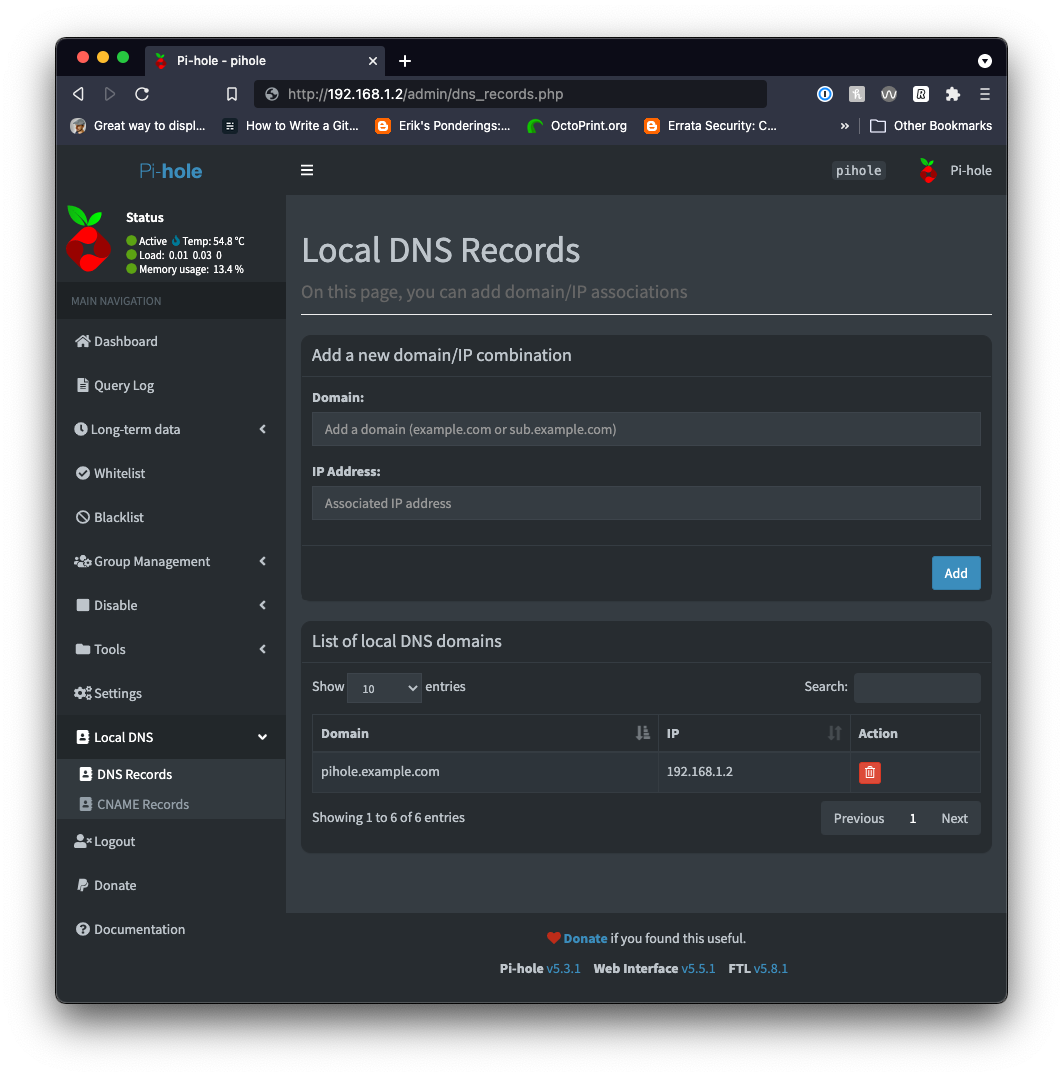
You should now be able to navigate to your Pi-Hole using the url http://pihole.example.com/admin.
Generating a certificate and configuring lighttpd
Now we will need to SSH into our Pi-Hole.
Open a terminal and type.
ssh pihole.example.com -l <username>
Once you have logged in you will want to switch over to the root user to install some components and configure lighttpd.
sudo su root -
Now we need to install the components that are required to get and use an SSL certificate; we are going to do this with a program called LEGO that uses Let’s Encypt to create and renew SSL certificates.
We are also going to need to install a lighttpd mod called lighttpd-mod-openssl to enable the
lighttpd daemon to serve HTTPS URL’s.
apt-get install lego lighttpd-mod-openssl
Once these components have been downloaded and installed, we are ready to start generating our certificate.
This part is going to vary based upon which domain provider you use. I personally use Gandi, so I need to have a look at the Gandi section of the LEGO DNS provider list https://go-acme.github.io/lego/dns/gandiv5/. This will tell me the code that I need to pass in on the command line, and the environment variable name I need to set up to pass in my API key (it’s different for each provider so that you can set up multiple providers if you so desire).
I can see that my code is going to be gandiv5 and my environment variable name is going to be GANDIV5_API_KEY (You will need to substitute these details for your domain
provider).
The next thing that we need to do is go over to our domain provider and generate an API key that Lego can use. It wasn’t instantly obvious where to find this when I went looking on
the Gandi website, so to make things easier, if you use them as well, you can use this link (You will need to replace <MyUsername> with your
username) https://account.gandi.net/en/users/<MyUsername>/security.
Now that we have our LEGO DNS code, our environment variable name, and our API Key, we are ready to generate a certificate.
When you run the following command it’s going to create a directory called /etc/lego and put your certificate information, as well as the files required to renew your
certificate, in there. I personally think /etc/ is a good place to store this information, but you can tweak this to any location you so desire.
(Don’t forget to swap out the e-mail address with a valid one, and use your own domain name before you run this command)
GANDIV5_API_KEY=<MY_API_KEY> lego --dns gandiv5 --email admin@example.com --key-type rsa2048 -d pihole.example.com --accept-tos --pem --path /etc/lego/ run
At this point lego will have created a series of files in the /etc/lego/ directory, our certificates will have been placed in the /etc/lego/certificates directory.
Now we need to update our lighttpd configuration to use this newly generated certificate.
vi /etc/lighttpd/external.conf
Add the following to this file (make sure you use your domain instead of example.com).
$HTTP["host"] == "pihole.example.com" {
    # Ensure the Pi-hole Block Page knows that this is not a blocked domain
    setenv.add-environment = ("fqdn" => "true")

    # Enable the SSL engine with a Lets Encyrpt cert, only for this specific host
    $SERVER["socket"] == ":443" {
        ssl.engine = "enable"
        ssl.pemfile = "/etc/lego/certificates/pihole.example.com.pem"
        ssl.ca-file =  "/etc/lego/certificates/pihole.example.com.issuer.crt"
        ssl.honor-cipher-order = "enable"
        ssl.cipher-list = "EECDH+AESGCM:EDH+AESGCM:AES256+EECDH:AES256+EDH"
        ssl.use-sslv2 = "disable"
        ssl.use-sslv3 = "disable"
    }

    # Redirect all HTTP traffic to HTTPS
    $HTTP["scheme"] == "http" {
        $HTTP["host"] =~ ".*" {
            url.redirect = (".*" => "https://%0$0")
        }
    }
    # Auto redirect to admin panel when hitting base URL
    url.redirect = ("^/$" => "/admin" )
}
Now we can restart lighttpd to load this config and everything should start working.
service lighttpd restart
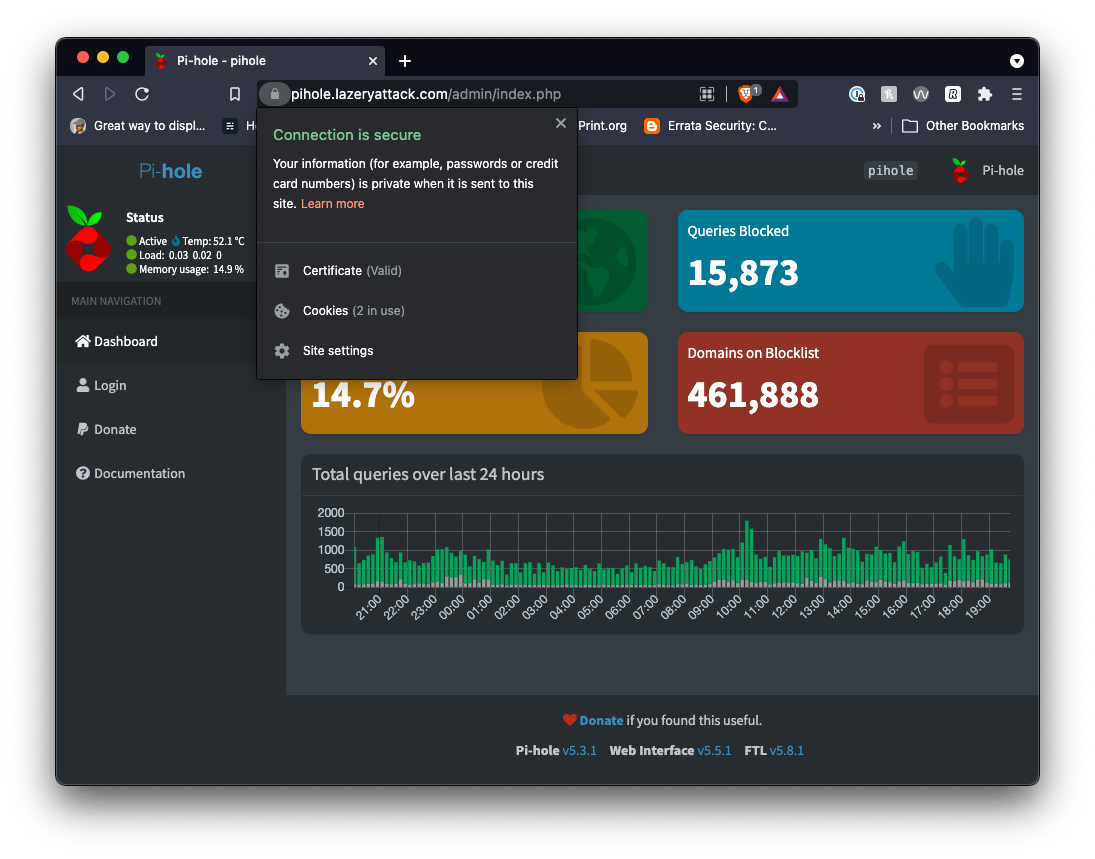
If you navigate to your Pi-Hole on your local network using the URL you have allocated (e.g. https://pihole.example.com) you will no longer see any certificate errors, and you
will automatically be redirected to your admin panel.
Automatically renewing your certificate
While everything is now working, it won’t stay that way for long if we don’t have a way to renew the certificate. The certificates are only valid for a maximum of 90 days, so we will need to remember to renew them before they expire.
The easiest way to do this is to set up a cron job to automate this. Let’s create a script in our cron.weekly directory to do this for us.
vi /etc/cron.weekly/renew_cert
*Note* that the file does not have a file extension, this is a requirement for scripts in /etc/cron.weekly/, anything with a file extension will not be run by cron as it is
using run-parts.
The code for the script to renew the key is below.
The first line of code performs a certificate renewal. The default setting for LEGO is that it will not renew certificates unless they have less than 30 days remaining on
them (You can change this if you desire, if you only want to renew them when they have less than 15 days left, you can add--days 15 onto the end of this command).
The second line of code restarts lighttpd to ensure that any new certificates that have been generated are loaded.
#!/bin/bash

echo -e "\nStarting certificate renewal process...\n"
GANDIV5_API_KEY=<MY_API_KEY> lego --dns gandiv5 --email admin@example.com -d pihole.example.com --path /etc/lego/ renew

echo -e "\nRestarting lighttpd service...\n"
service lighttpd restart
Once we have saved this file we need to make sure that it is executable so that the cron job can run it.
chmod +x /etc/cron.weekly/renew_cert
Now we need to test that this script works, but we are not going to run it the standard way; we are going to run it the same way that cron will (you can see this command in
your /etc/crontab). This way we can check that the cron job is configured correctly, and it will run this script every week.
test -x /usr/sbin/anacron || ( cd / && run-parts --report /etc/cron.weekly )
The output should look like this.
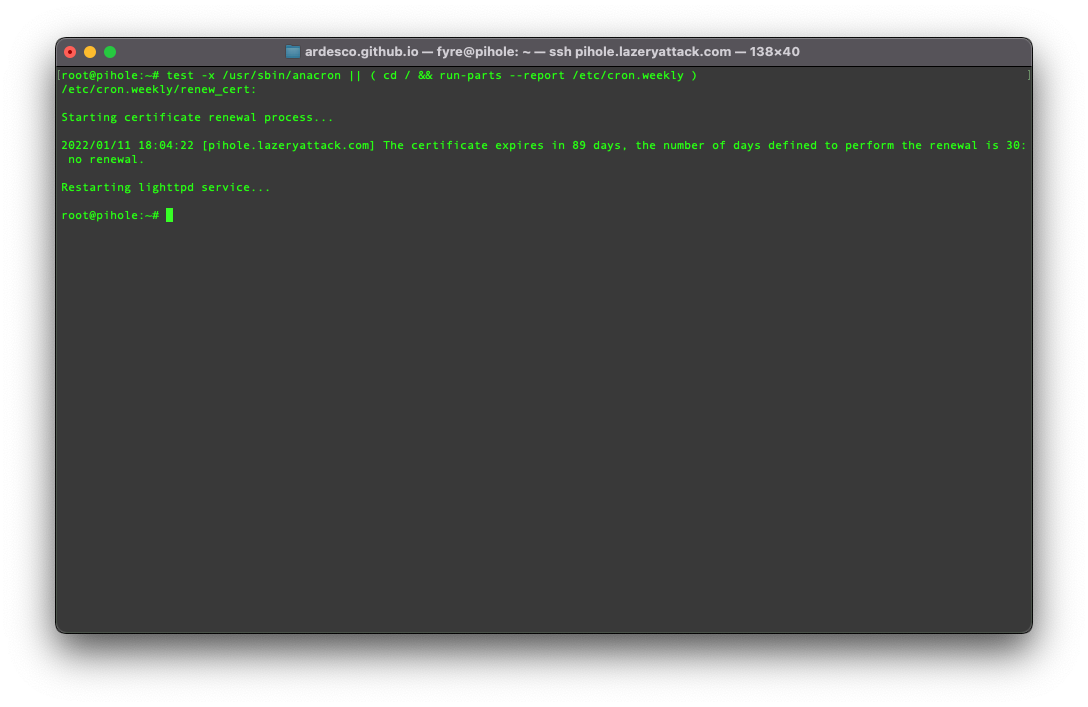
You now have a cron job set up that will run once a week to see if your certificate needs to be updated.
All certificate updates from this point forward will be automated.